Simple Beef Dinner Recipe for a Comfortable Evening at Home
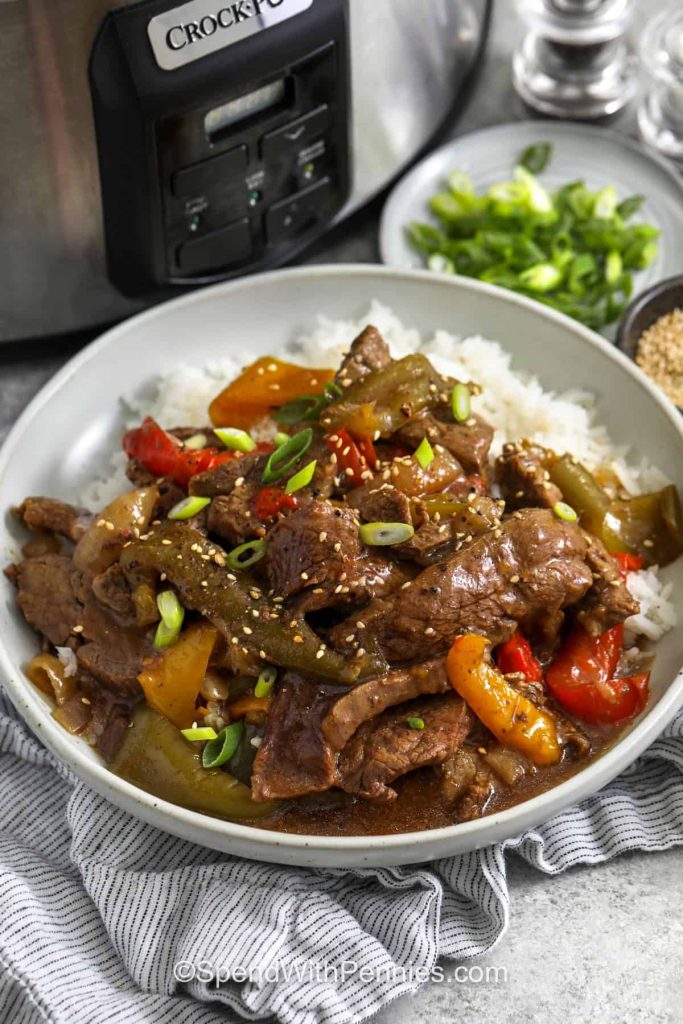
# Slow Cooker Pepper Steak: An Effortless Treat
Slow Cooker Pepper Steak turns basic steak and peppers into a tasty and fulfilling main dish. This recipe features a hands-off method, allowing you to bypass the browning stage often necessary in stovetop preparations. Instead, you can let your slow cooker handle everything, making it a superb option for hectic weeknights.
## Recipe Highlights
– **Flavor**: This dish presents a savory and somewhat sweet flavor profile, accentuated by ginger and garlic, coupled with a rich beef taste and a touch of spice.
– **Convenience**: No skillet browning is required; just add the beef, veggies, and sauce to the slow cooker and let it cook away.
– **Serving Suggestions**: Serve it atop fluffy white rice, baked brown rice, or noodles, paired with steamed broccoli for a complete meal.
### Total Time
– **Preparation**: 11 minutes
– **Cooking**: 5 hours and 20 minutes
– **Total**: 5 hours and 31 minutes
– **Servings**: 4
## Ingredients Notes
– **Flank Steak or Sirloin Steak**: Both cuts are suitable, though flank steak tends to be more flavorful.
– **Bell Peppers**: A combination of various colors enhances visual appeal. For a crunchy texture, add them towards the end of the cooking time.
– **Fresh Ginger**: Freshly minced ginger delivers the best flavor, although ground ginger can serve as a substitute.
– **Soy Sauce**: This component contributes umami flavor; opt for regular or reduced-sodium varieties.
– **Honey**: Offsets the saltiness of soy sauce with a hint of sweetness. Brown sugar may also be used as an alternative.
## Cooking Tips
– **Slice Against the Grain**: To achieve tender strips of steak, slice against the grain with a sharp knife.
– **Adding Peppers**: For softer peppers, include them at the start. For a tender-crisp bite, add them in the final hour of cooking.
– **Thicken on High**: Create a slurry using cornstarch and cold water, then incorporate it into the cooking liquid 20-30 minutes before serving.
– **Rest Before Serving**: Let the dish sit uncovered for a few moments after thickening, allowing the sauce to adhere to the beef.
## Storing Leftovers
– **Refrigerate**: Keep leftovers in an airtight container for up to 4 days.
– **Freeze**: Store cooled pepper steak in airtight containers or zippered bags for as long as 4 months. Thaw overnight in the refrigerator.
– **Reheat**: Warm portions in the microwave or on the stovetop over low heat, removing them promptly to prevent overcooking.
## Conclusion
Slow Cooker Pepper Steak is an excellent choice for anyone looking for a tasty and easy-to-make meal. With minimal preparation and hands-off cooking, it’s ideal for busy evenings when you desire a delicious dinner without the hassle. Savor this flavorful dish over rice or noodles for a fulfilling meal that the entire family will enjoy.

Fast and Simple Chicken Tacos for Hectic Evenings
**Swift and Simple Chicken Tacos for Hectic Evenings**
In the whirlwind of contemporary life, carving out time to create a tasty and wholesome meal can be tough. Here come the swift and simple chicken tacos—an excellent answer for hectic evenings. This meal is not only effortless to make but also bursting with flavor, making it a household favorite.
**Ingredients:**
– 1 pound of boneless, skinless chicken breasts
– 1 tablespoon of olive oil
– 1 packet of taco seasoning (or a homemade mix)
– 8 small corn or flour tortillas
– 1 cup of shredded lettuce
– 1 cup of diced tomatoes
– 1 cup of shredded cheese (cheddar or Mexican blend)
– 1/2 cup of sour cream
– 1/2 cup of salsa
– Optional toppings: sliced jalapeños, avocado, cilantro, lime wedges
**Instructions:**
1. **Prepare the Chicken:** Begin by cutting the chicken breasts into small, bite-sized pieces. This not only helps the chicken cook quicker but also guarantees that each taco is filled with tender, juicy meat.
2. **Cook the Chicken:** Heat the olive oil in a large skillet over medium-high heat. Add the chicken pieces to the skillet and sprinkle with taco seasoning. Stir well to make sure the chicken is evenly coated. Cook for around 7-10 minutes, stirring occasionally, until the chicken is thoroughly cooked and no longer pink in the middle.
3. **Warm the Tortillas:** While the chicken is cooking, warm the tortillas. You can do this by placing them in a dry skillet over medium heat for about 30 seconds on each side or wrapping them in a damp paper towel and microwaving for about 20 seconds.
4. **Assemble the Tacos:** Once the chicken is cooked, it’s time to put together the tacos. Place a generous spoonful of chicken onto each tortilla. Add shredded lettuce, diced tomatoes, and shredded cheese on top.
5. **Add the Finishing Touches:** Add a dollop of sour cream and a spoonful of salsa to each taco. For an extra kick of flavor, consider adding optional toppings like sliced jalapeños, avocado, fresh cilantro, or a squeeze of lime juice.
**Tips for Success:**
– **Make It Your Own:** Feel free to personalize these tacos to fit your preferences. Swap out the chicken for beef, pork, or even a vegetarian option like black beans or grilled vegetables.
– **Prep Ahead:** Save time by preparing ingredients beforehand. Chop the vegetables and shred the cheese the night before to streamline the cooking process.
– **Double the Recipe:** These tacos are great for leftovers. Double the recipe and enjoy them for lunch the following day.
**Conclusion:**
Swift and simple chicken tacos are a lifesaver for hectic evenings. With minimal prep and cooking time, this dish allows you to serve a satisfying meal without spending hours in the kitchen. Whether you’re feeding a family or just yourself, these tacos are sure to become a staple in your weeknight dinner rotation. Enjoy the vibrant flavors and ease of this classic dish, and relish the extra time you gain to relax and unwind.
Stir-Fried Chicken with Zucchini Recipe
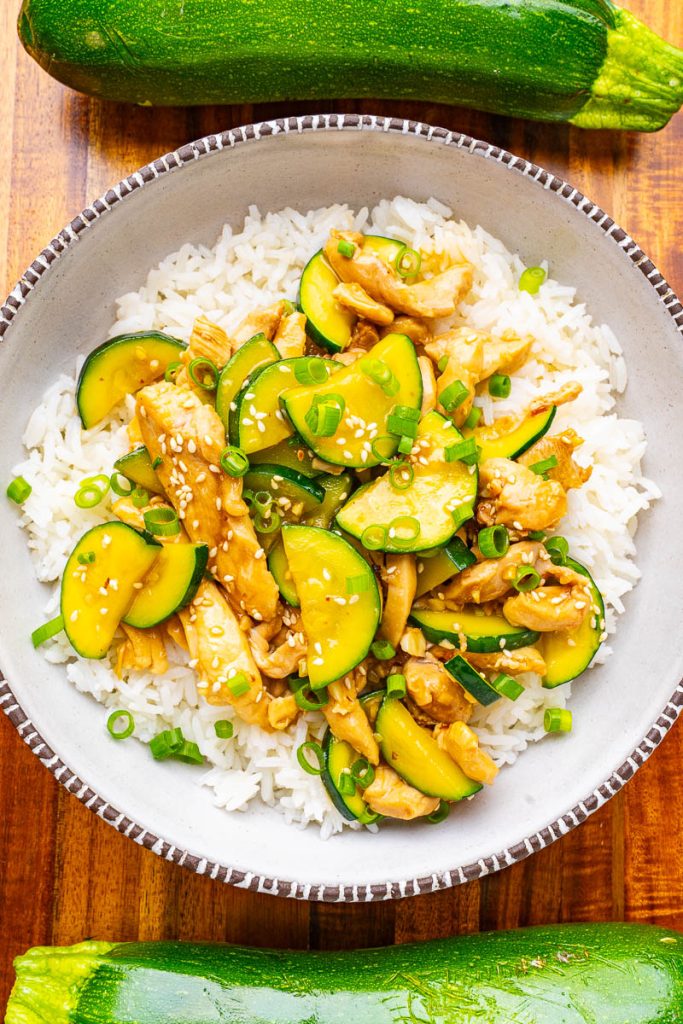
Stir-Fried Chicken and Zucchini
Preparation Time: 10 minutes Cooking Time: 10 minutes Total Duration: 20 minutes Servings: 4
A delicious and quick stir-fry featuring chicken and zucchini.
ingredients
- 1 tablespoon cooking oil
- 1 pound boneless skinless chicken breast or thighs, sliced thin
- 1 1/2 pounds zucchini, cut thin
- 4 green onions, sliced thin and separated into whites and greens
- 1 tablespoon grated garlic
- 1 tablespoon grated ginger
- 1/2 teaspoon red pepper flakes (optional)
- 1/3 cup chicken broth (link)
- 1 tablespoon oyster sauce
- 1 teaspoon soy sauce
- 1 teaspoon sugar
- 1 tablespoon rice vinegar
- 1 tablespoon cornstarch
- 1/2 teaspoon sesame oil
- 1 teaspoon toasted sesame seeds
instructions
- In a wok or large skillet, heat the oil over medium-high heat, add the chicken and stir-fry until done, approximately 3-5 minutes, then set aside.
- Introduce the zucchini and stir-fry until it begins to darken, roughly 3-4 minutes, then remove from heat.
- Incorporate the whites of the green onions, garlic, ginger, and red pepper flakes, cooking until aromatic, about 30 seconds.
- Stir together the broth, oyster sauce, soy sauce, sugar, vinegar, and cornstarch, then add the chicken and zucchini; stir and cook until the sauce thickens, about 2 minutes.
- Mix in the greens of the green onions, sesame oil, and toasted sesame seeds, and savor!
Note: Add more oil if necessary.
Option: Tenderize the chicken by marinating in a mixture of 1 egg white, 1/2 teaspoon baking soda, 1 tablespoon Shaoxing wine (optional), and 1 tablespoon cornstarch for 1-2 hours in the fridge. This will make the chicken incredibly tender.
Option: Stir in 1/3 cup of cashews at the end.
Straightforward One-Pot Recipe for Hainanese Chicken Rice
# If You’re Seeking Your Next Effortless, Scrumptious One Pot Dinner, Look No Further: Hainanese Chicken Rice
## Why This Recipe Will Captivate You
– Lightning-fast one pot rendition of Hainanese chicken rice
– Chicken cooks simultaneously with the rice rather than beforehand
– Skin-on chicken thighs instead of an entire poached chicken
– 45 minutes as opposed to a lengthy 3/24/48(!) hour endeavor
## Overview
| Flavor Profile | Savory, ginger-garlic, richly chicken-flavored, with delightful sauces |
|—————-|———————————————————————|
| Make Ahead Tips | None required |
| Diet | [Gluten free](https://iamafoodblog.com/category/recipes/diets/gluten-free/), [high protein](https://iamafoodblog.com/category/recipes/diets/high-protein/) |
| Storage | Store covered in the refrigerator for as long as 48 hours |
| Reheating | Microwave is the easiest option, or steam |
| Difficulty | Simple |
| Pair It With | Nothing, it’s a complete meal |
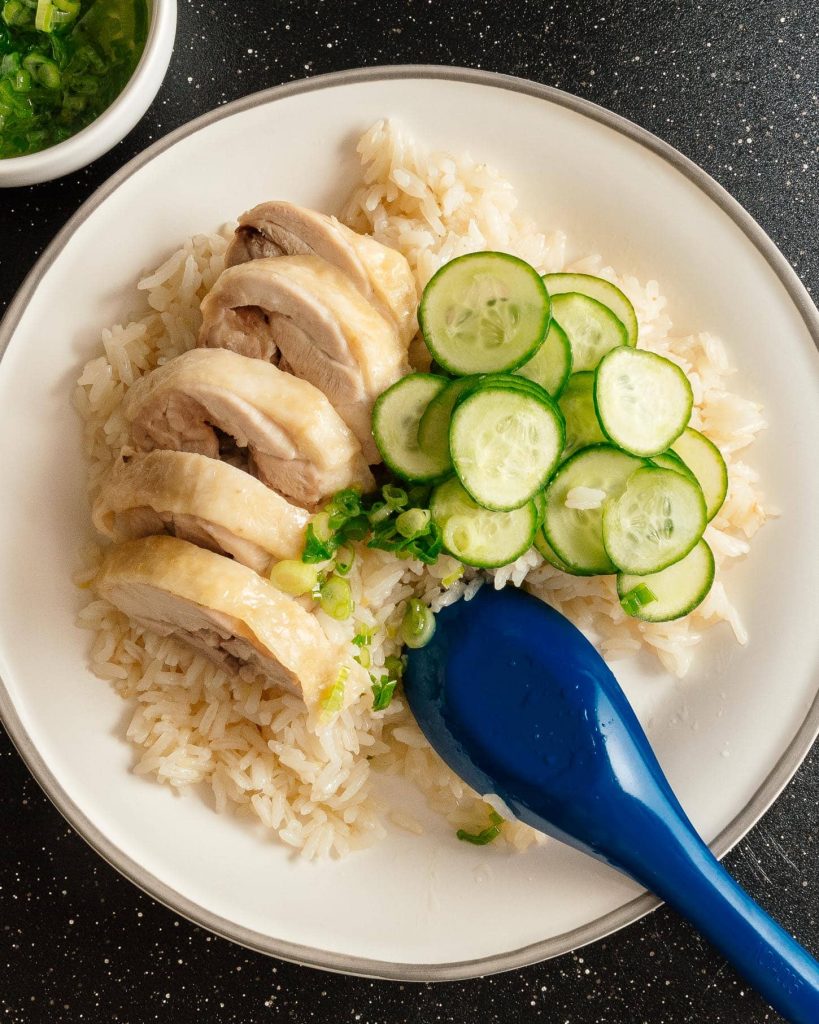
Hainanese chicken rice is a cherished dish that merges the ease of poached chicken with aromatic rice cooked in chicken broth. This one-pot adaptation streamlines the classic approach, making it ideal for hectic weeknights.
## My Lifelong Affection for Hainanese Chicken Rice
Hainanese chicken rice is my ultimate source of comfort, evoking memories of childhood and family gatherings. It’s a dish that offers warmth and nostalgia, serving as my preferred meal for surprise visitors or relaxed evenings. The pairing of tender chicken and savory rice is unparalleled, and this straightforward recipe encapsulates all the charm of the traditional dish without the extensive preparation time.
## What is Hainanese Chicken Rice?
Hailing from Hainan in Southern China, Hainanese chicken rice showcases silken poached chicken served alongside rice cooked in chicken fat and broth. Typically served with an array of sauces and cucumber, this dish has found a true home in Singapore, where it is an essential menu item in both hawker centers and upscale restaurants.
## What Makes the Rice So Unique?
The rice in Hainanese chicken rice stands out because it is prepared in chicken fat and broth, imbuing it with deep flavors. The technique of sautéing the rice with aromatics such as garlic, ginger, and shallots prior to cooking intensifies its flavor, resulting in a shiny and fragrant dish.
## The Best Chicken Rice is the One You Enjoy Preparing
While classic recipes may entail long processes, this one-pot variant allows for a quick and gratifying meal. Utilizing skin-on boneless chicken thighs guarantees that the chicken cooks uniformly with the rice, creating an effortless and delectable choice for any night of the week.
## The Secret to Exceptional Hainanese Chicken Rice
The secret to this dish lies in rendered chicken fat, which contributes depth and taste to the rice. If chicken fat is not accessible, any cooking oil will work, though the flavor may not be as rich. Cooking the aromatics in fat ensures that their essence fully permeates the rice.
## How to Render Chicken Fat
1. **Collect**: Trim away excess skin from chicken thighs and reserve for rendering.
2. **Chop**: Dice chicken skin into small pieces.
3. **Slowly Render**: Cook chicken skins in a non-stick skillet over medium-low heat until fat is rendered.
4. **Crisp**: Raise the heat to medium and fry until the skins are crispy.
5. **Strain**: Remove crispy skins and keep rendered fat for future use.
## Chicken Thigh vs. Chicken Breast
Although both cuts are viable, chicken thighs are favored for their tenderness and taste. If opting for chicken breasts, ensure they are cooked thoroughly to prevent dryness.
## How to Debone Chicken Thighs
1. Position the chicken thigh skin-side down.
2. Identify the bone and carefully slice along its sides.
3. Extract the bone, keeping the thigh intact for cooking.
## Chicken and Rice Worldwide
Numerous cultures present their own iterations of chicken and rice, each with distinct flavors and methods of preparation. Hainanese chicken rice excels for its simplicity and rich taste, earning it a treasured spot in many homes.
## How Do You Enjoy Hainanese Chicken Rice?
Hainanese chicken rice can be savored in various styles. Some individuals prefer to blend all sauces together, while others choose to keep them separate. Traditionally, it is plated with a spoon and fork, rather than served in a bowl.
## What to Accompany Hainanese Chicken Rice
Often paired with poaching broth, chili sauce, scallion-ginger sauce, and dark soy sauce, this dish can also be enhanced with fresh cucumber slices.
## Homemade Hainanese Sauces
### Scallion Oil
– 4 cloves garlic
– 1/2 cup scallions
– 1 tbsp fresh ginger

Roasted Pumpkin Soup: An Autumn Seasonal Recipe
### Butternut Squash Soup: A Creamy Favorite for the Family
This **Butternut Squash Soup** is a creamy favorite among families, made with roasted squash, soft apples, and a blend of warm herbs and spices. Topped with a hint of cream, it’s an *effortless and tasty* soup, perfect for the autumn season.
Pair it with [homemade garlic bread](https://www.spendwithpennies.com/homemade-garlic-bread/) or a [grilled cheese sandwich](https://www.spendwithpennies.com/the-best-grilled-cheese-sandwich/) for dipping!
#### Holly’s Recipe Features: Butternut Squash Soup
– **Flavor:** Luxurious and creamy with sweet roasted squash and apple, savory herbs, warm curry, and a sprinkle of pepper.
– **Why It’s Exceptional:** No peeling required, minimal chopping, and just a single pot for a simple homemade soup that involves less preparation and cleanup.
– **Time Efficient:** Opt for pre-cut cubed butternut squash and [roast the butternut squash](https://www.spendwithpennies.com/roasted-butternut-squash/) until it becomes tender and golden.
**Cooking Time:** 1 Hr 25 Mins (15 Mins Preparation)
**Yield:** 4 Servings
**Cooking Method:** Stovetop
### Ingredient Information
– **Butternut Squash:** Select a solid squash that is heavy for its size. Roasting it in large chunks eliminates the need for peeling. You can substitute it with [roasted acorn squash](https://www.spendwithpennies.com/honey-butter-roasted-acorn-squash/) or [roasted delicata squash](https://www.spendwithpennies.com/roasted-delicata-squash/).
– **Apple:** A moderately tart apple, like Granny Smith, adds contrast, while sweeter types enhance the sweetness of the soup.
– **Heavy Cream:** Start with a smaller amount and add more according to your taste. Coconut milk serves as a simple dairy-free option.
– **Curry Powder (optional):** It brings mild warmth and complexity without overpowering the soup with a curry flavor. Omit it for a more traditional squash taste.
### Steps to Prepare Butternut Squash Soup
1. Slice the squash and roast it. Scoop the flesh out.
2. Sauté the onion, then incorporate the roasted squash, broth, apple, and spices. Let it simmer.
3. Blend until smooth, return to the pot, and add cream according to your taste.
Season and garnish with [croutons](https://www.spendwithpennies.com/parmesan-garlic-n-herb-croutons-2-ways-regular-lightened/), [roasted pumpkin seeds](https://www.spendwithpennies.com/roasted-pumpkin-seeds/), or toasted nuts before serving.
#### Success Tips
– **Pre-roast:** Roast the squash in advance, then store the cooked flesh in the refrigerator for a quick start on dinner.
– **Smooth Consistency:** If utilizing an [immersion blender](https://amzlink.to/az0JQdunkVDVu), strain the soup for a smoother texture. If using a high-powered blender like a [Vitamix](https://amzlink.to/az0uL077gbifu), straining is not necessary.
– **Batch Processing:** When blending hot soup in a countertop blender, do it in smaller batches to avoid splattering from overfilling.
– **Modify Thickness:** If the soup is overly thick, incrementally add broth. If it’s too thin, allow it to simmer uncovered until it thickens.
### Soup Storage for Later
– Store leftovers in an airtight container in the fridge for up to 4 days. Freeze before incorporating the heavy cream.
– Thaw overnight and reheat on the stove over medium-low heat, stirring occasionally, or heat individual portions in the microwave until warm.
### More Butternut Squash Delights
Did you enjoy this Butternut Squash Soup? Feel free to leave a comment and rating below.
Simple Beef Dinner Recipe for a Comfortable Evening at Home
# Slow Cooker Pepper Steak: An Effortless Treat
Slow Cooker Pepper Steak turns basic steak and peppers into a tasty and fulfilling main dish. This recipe features a hands-off method, allowing you to bypass the browning stage often necessary in stovetop preparations. Instead, you can let your slow cooker handle everything, making it a superb option for hectic weeknights.
## Recipe Highlights
– **Flavor**: This dish presents a savory and somewhat sweet flavor profile, accentuated by ginger and garlic, coupled with a rich beef taste and a touch of spice.
– **Convenience**: No skillet browning is required; just add the beef, veggies, and sauce to the slow cooker and let it cook away.
– **Serving Suggestions**: Serve it atop fluffy white rice, baked brown rice, or noodles, paired with steamed broccoli for a complete meal.
### Total Time
– **Preparation**: 11 minutes
– **Cooking**: 5 hours and 20 minutes
– **Total**: 5 hours and 31 minutes
– **Servings**: 4
## Ingredients Notes
– **Flank Steak or Sirloin Steak**: Both cuts are suitable, though flank steak tends to be more flavorful.
– **Bell Peppers**: A combination of various colors enhances visual appeal. For a crunchy texture, add them towards the end of the cooking time.
– **Fresh Ginger**: Freshly minced ginger delivers the best flavor, although ground ginger can serve as a substitute.
– **Soy Sauce**: This component contributes umami flavor; opt for regular or reduced-sodium varieties.
– **Honey**: Offsets the saltiness of soy sauce with a hint of sweetness. Brown sugar may also be used as an alternative.
## Cooking Tips
– **Slice Against the Grain**: To achieve tender strips of steak, slice against the grain with a sharp knife.
– **Adding Peppers**: For softer peppers, include them at the start. For a tender-crisp bite, add them in the final hour of cooking.
– **Thicken on High**: Create a slurry using cornstarch and cold water, then incorporate it into the cooking liquid 20-30 minutes before serving.
– **Rest Before Serving**: Let the dish sit uncovered for a few moments after thickening, allowing the sauce to adhere to the beef.
## Storing Leftovers
– **Refrigerate**: Keep leftovers in an airtight container for up to 4 days.
– **Freeze**: Store cooled pepper steak in airtight containers or zippered bags for as long as 4 months. Thaw overnight in the refrigerator.
– **Reheat**: Warm portions in the microwave or on the stovetop over low heat, removing them promptly to prevent overcooking.
## Conclusion
Slow Cooker Pepper Steak is an excellent choice for anyone looking for a tasty and easy-to-make meal. With minimal preparation and hands-off cooking, it’s ideal for busy evenings when you desire a delicious dinner without the hassle. Savor this flavorful dish over rice or noodles for a fulfilling meal that the entire family will enjoy.
Read More Fast and Simple Chicken Tacos for Hectic Evenings
**Swift and Simple Chicken Tacos for Hectic Evenings**
In the whirlwind of contemporary life, carving out time to create a tasty and wholesome meal can be tough. Here come the swift and simple chicken tacos—an excellent answer for hectic evenings. This meal is not only effortless to make but also bursting with flavor, making it a household favorite.
**Ingredients:**
– 1 pound of boneless, skinless chicken breasts
– 1 tablespoon of olive oil
– 1 packet of taco seasoning (or a homemade mix)
– 8 small corn or flour tortillas
– 1 cup of shredded lettuce
– 1 cup of diced tomatoes
– 1 cup of shredded cheese (cheddar or Mexican blend)
– 1/2 cup of sour cream
– 1/2 cup of salsa
– Optional toppings: sliced jalapeños, avocado, cilantro, lime wedges
**Instructions:**
1. **Prepare the Chicken:** Begin by cutting the chicken breasts into small, bite-sized pieces. This not only helps the chicken cook quicker but also guarantees that each taco is filled with tender, juicy meat.
2. **Cook the Chicken:** Heat the olive oil in a large skillet over medium-high heat. Add the chicken pieces to the skillet and sprinkle with taco seasoning. Stir well to make sure the chicken is evenly coated. Cook for around 7-10 minutes, stirring occasionally, until the chicken is thoroughly cooked and no longer pink in the middle.
3. **Warm the Tortillas:** While the chicken is cooking, warm the tortillas. You can do this by placing them in a dry skillet over medium heat for about 30 seconds on each side or wrapping them in a damp paper towel and microwaving for about 20 seconds.
4. **Assemble the Tacos:** Once the chicken is cooked, it’s time to put together the tacos. Place a generous spoonful of chicken onto each tortilla. Add shredded lettuce, diced tomatoes, and shredded cheese on top.
5. **Add the Finishing Touches:** Add a dollop of sour cream and a spoonful of salsa to each taco. For an extra kick of flavor, consider adding optional toppings like sliced jalapeños, avocado, fresh cilantro, or a squeeze of lime juice.
**Tips for Success:**
– **Make It Your Own:** Feel free to personalize these tacos to fit your preferences. Swap out the chicken for beef, pork, or even a vegetarian option like black beans or grilled vegetables.
– **Prep Ahead:** Save time by preparing ingredients beforehand. Chop the vegetables and shred the cheese the night before to streamline the cooking process.
– **Double the Recipe:** These tacos are great for leftovers. Double the recipe and enjoy them for lunch the following day.
**Conclusion:**
Swift and simple chicken tacos are a lifesaver for hectic evenings. With minimal prep and cooking time, this dish allows you to serve a satisfying meal without spending hours in the kitchen. Whether you’re feeding a family or just yourself, these tacos are sure to become a staple in your weeknight dinner rotation. Enjoy the vibrant flavors and ease of this classic dish, and relish the extra time you gain to relax and unwind.
Read More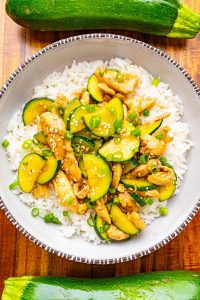
Stir-Fried Chicken with Zucchini Recipe
Stir-Fried Chicken and Zucchini
Preparation Time: 10 minutes Cooking Time: 10 minutes Total Duration: 20 minutes Servings: 4
A delicious and quick stir-fry featuring chicken and zucchini.
ingredients
- 1 tablespoon cooking oil
- 1 pound boneless skinless chicken breast or thighs, sliced thin
- 1 1/2 pounds zucchini, cut thin
- 4 green onions, sliced thin and separated into whites and greens
- 1 tablespoon grated garlic
- 1 tablespoon grated ginger
- 1/2 teaspoon red pepper flakes (optional)
- 1/3 cup chicken broth (link)
- 1 tablespoon oyster sauce
- 1 teaspoon soy sauce
- 1 teaspoon sugar
- 1 tablespoon rice vinegar
- 1 tablespoon cornstarch
- 1/2 teaspoon sesame oil
- 1 teaspoon toasted sesame seeds
instructions
- In a wok or large skillet, heat the oil over medium-high heat, add the chicken and stir-fry until done, approximately 3-5 minutes, then set aside.
- Introduce the zucchini and stir-fry until it begins to darken, roughly 3-4 minutes, then remove from heat.
- Incorporate the whites of the green onions, garlic, ginger, and red pepper flakes, cooking until aromatic, about 30 seconds.
- Stir together the broth, oyster sauce, soy sauce, sugar, vinegar, and cornstarch, then add the chicken and zucchini; stir and cook until the sauce thickens, about 2 minutes.
- Mix in the greens of the green onions, sesame oil, and toasted sesame seeds, and savor!
Note: Add more oil if necessary.
Option: Tenderize the chicken by marinating in a mixture of 1 egg white, 1/2 teaspoon baking soda, 1 tablespoon Shaoxing wine (optional), and 1 tablespoon cornstarch for 1-2 hours in the fridge. This will make the chicken incredibly tender.
Option: Stir in 1/3 cup of cashews at the end.
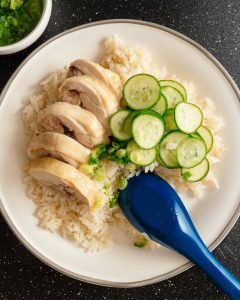
Straightforward One-Pot Recipe for Hainanese Chicken Rice
# If You’re Seeking Your Next Effortless, Scrumptious One Pot Dinner, Look No Further: Hainanese Chicken Rice
## Why This Recipe Will Captivate You
– Lightning-fast one pot rendition of Hainanese chicken rice
– Chicken cooks simultaneously with the rice rather than beforehand
– Skin-on chicken thighs instead of an entire poached chicken
– 45 minutes as opposed to a lengthy 3/24/48(!) hour endeavor
## Overview
| Flavor Profile | Savory, ginger-garlic, richly chicken-flavored, with delightful sauces |
|—————-|———————————————————————|
| Make Ahead Tips | None required |
| Diet | [Gluten free](https://iamafoodblog.com/category/recipes/diets/gluten-free/), [high protein](https://iamafoodblog.com/category/recipes/diets/high-protein/) |
| Storage | Store covered in the refrigerator for as long as 48 hours |
| Reheating | Microwave is the easiest option, or steam |
| Difficulty | Simple |
| Pair It With | Nothing, it’s a complete meal |
Hainanese chicken rice is a cherished dish that merges the ease of poached chicken with aromatic rice cooked in chicken broth. This one-pot adaptation streamlines the classic approach, making it ideal for hectic weeknights.
## My Lifelong Affection for Hainanese Chicken Rice
Hainanese chicken rice is my ultimate source of comfort, evoking memories of childhood and family gatherings. It’s a dish that offers warmth and nostalgia, serving as my preferred meal for surprise visitors or relaxed evenings. The pairing of tender chicken and savory rice is unparalleled, and this straightforward recipe encapsulates all the charm of the traditional dish without the extensive preparation time.
## What is Hainanese Chicken Rice?
Hailing from Hainan in Southern China, Hainanese chicken rice showcases silken poached chicken served alongside rice cooked in chicken fat and broth. Typically served with an array of sauces and cucumber, this dish has found a true home in Singapore, where it is an essential menu item in both hawker centers and upscale restaurants.
## What Makes the Rice So Unique?
The rice in Hainanese chicken rice stands out because it is prepared in chicken fat and broth, imbuing it with deep flavors. The technique of sautéing the rice with aromatics such as garlic, ginger, and shallots prior to cooking intensifies its flavor, resulting in a shiny and fragrant dish.
## The Best Chicken Rice is the One You Enjoy Preparing
While classic recipes may entail long processes, this one-pot variant allows for a quick and gratifying meal. Utilizing skin-on boneless chicken thighs guarantees that the chicken cooks uniformly with the rice, creating an effortless and delectable choice for any night of the week.
## The Secret to Exceptional Hainanese Chicken Rice
The secret to this dish lies in rendered chicken fat, which contributes depth and taste to the rice. If chicken fat is not accessible, any cooking oil will work, though the flavor may not be as rich. Cooking the aromatics in fat ensures that their essence fully permeates the rice.
## How to Render Chicken Fat
1. **Collect**: Trim away excess skin from chicken thighs and reserve for rendering.
2. **Chop**: Dice chicken skin into small pieces.
3. **Slowly Render**: Cook chicken skins in a non-stick skillet over medium-low heat until fat is rendered.
4. **Crisp**: Raise the heat to medium and fry until the skins are crispy.
5. **Strain**: Remove crispy skins and keep rendered fat for future use.
## Chicken Thigh vs. Chicken Breast
Although both cuts are viable, chicken thighs are favored for their tenderness and taste. If opting for chicken breasts, ensure they are cooked thoroughly to prevent dryness.
## How to Debone Chicken Thighs
1. Position the chicken thigh skin-side down.
2. Identify the bone and carefully slice along its sides.
3. Extract the bone, keeping the thigh intact for cooking.
## Chicken and Rice Worldwide
Numerous cultures present their own iterations of chicken and rice, each with distinct flavors and methods of preparation. Hainanese chicken rice excels for its simplicity and rich taste, earning it a treasured spot in many homes.
## How Do You Enjoy Hainanese Chicken Rice?
Hainanese chicken rice can be savored in various styles. Some individuals prefer to blend all sauces together, while others choose to keep them separate. Traditionally, it is plated with a spoon and fork, rather than served in a bowl.
## What to Accompany Hainanese Chicken Rice
Often paired with poaching broth, chili sauce, scallion-ginger sauce, and dark soy sauce, this dish can also be enhanced with fresh cucumber slices.
## Homemade Hainanese Sauces
### Scallion Oil
– 4 cloves garlic
– 1/2 cup scallions
– 1 tbsp fresh ginger

Roasted Pumpkin Soup: An Autumn Seasonal Recipe
### Butternut Squash Soup: A Creamy Favorite for the Family
This **Butternut Squash Soup** is a creamy favorite among families, made with roasted squash, soft apples, and a blend of warm herbs and spices. Topped with a hint of cream, it’s an *effortless and tasty* soup, perfect for the autumn season.
Pair it with [homemade garlic bread](https://www.spendwithpennies.com/homemade-garlic-bread/) or a [grilled cheese sandwich](https://www.spendwithpennies.com/the-best-grilled-cheese-sandwich/) for dipping!
#### Holly’s Recipe Features: Butternut Squash Soup
– **Flavor:** Luxurious and creamy with sweet roasted squash and apple, savory herbs, warm curry, and a sprinkle of pepper.
– **Why It’s Exceptional:** No peeling required, minimal chopping, and just a single pot for a simple homemade soup that involves less preparation and cleanup.
– **Time Efficient:** Opt for pre-cut cubed butternut squash and [roast the butternut squash](https://www.spendwithpennies.com/roasted-butternut-squash/) until it becomes tender and golden.
**Cooking Time:** 1 Hr 25 Mins (15 Mins Preparation)
**Yield:** 4 Servings
**Cooking Method:** Stovetop
### Ingredient Information
– **Butternut Squash:** Select a solid squash that is heavy for its size. Roasting it in large chunks eliminates the need for peeling. You can substitute it with [roasted acorn squash](https://www.spendwithpennies.com/honey-butter-roasted-acorn-squash/) or [roasted delicata squash](https://www.spendwithpennies.com/roasted-delicata-squash/).
– **Apple:** A moderately tart apple, like Granny Smith, adds contrast, while sweeter types enhance the sweetness of the soup.
– **Heavy Cream:** Start with a smaller amount and add more according to your taste. Coconut milk serves as a simple dairy-free option.
– **Curry Powder (optional):** It brings mild warmth and complexity without overpowering the soup with a curry flavor. Omit it for a more traditional squash taste.
### Steps to Prepare Butternut Squash Soup
1. Slice the squash and roast it. Scoop the flesh out.
2. Sauté the onion, then incorporate the roasted squash, broth, apple, and spices. Let it simmer.
3. Blend until smooth, return to the pot, and add cream according to your taste.
Season and garnish with [croutons](https://www.spendwithpennies.com/parmesan-garlic-n-herb-croutons-2-ways-regular-lightened/), [roasted pumpkin seeds](https://www.spendwithpennies.com/roasted-pumpkin-seeds/), or toasted nuts before serving.
#### Success Tips
– **Pre-roast:** Roast the squash in advance, then store the cooked flesh in the refrigerator for a quick start on dinner.
– **Smooth Consistency:** If utilizing an [immersion blender](https://amzlink.to/az0JQdunkVDVu), strain the soup for a smoother texture. If using a high-powered blender like a [Vitamix](https://amzlink.to/az0uL077gbifu), straining is not necessary.
– **Batch Processing:** When blending hot soup in a countertop blender, do it in smaller batches to avoid splattering from overfilling.
– **Modify Thickness:** If the soup is overly thick, incrementally add broth. If it’s too thin, allow it to simmer uncovered until it thickens.
### Soup Storage for Later
– Store leftovers in an airtight container in the fridge for up to 4 days. Freeze before incorporating the heavy cream.
– Thaw overnight and reheat on the stove over medium-low heat, stirring occasionally, or heat individual portions in the microwave until warm.
### More Butternut Squash Delights
Did you enjoy this Butternut Squash Soup? Feel free to leave a comment and rating below.
Read More
Cottage Cheese Chocolate Chip Cookies: An Irresistible Unintentional Invention
Title: Chocolate Chip Cookies with Cottage Cheese: A Tasty Accidental Invention
Introduction
Within the realm of cooking, some of the most enjoyable recipes come into existence purely by chance. One such invention is the Chocolate Chip Cookie with Cottage Cheese. This distinctive variation on the traditional chocolate chip cookie merges the smooth texture of cottage cheese with the sweet, indulgent flavor of chocolate chips, resulting in a cookie that is both delectable and fascinating.
The Accidental Invention
The tale of Chocolate Chip Cookies with Cottage Cheese begins in a modest home kitchen, where a passionate baker was set to create a traditional batch of chocolate chip cookies. In an instant of distraction, cottage cheese was inadvertently included in the mixture instead of the correct ingredient. Instead of discarding the batter, the baker chose to continue with the endeavor, eager to discover the outcome of the cookies.
To their astonishment, the cookies came out of the oven with a soft, chewy consistency and a hint of tanginess that enhanced the sweetness of the chocolate chips. The unintentional addition of cottage cheese had reinvented the classic cookie into something completely new and enjoyable.
The Distinctive Flavor Profile
Cottage cheese, recognized for its creamy texture and subtle taste, contributes a distinct element to these cookies. When baked, the cottage cheese melts into the dough, yielding a moist and tender crumb. The slight tang of the cheese harmonizes with the sweetness of the chocolate chips, creating a balanced flavor profile that is both fulfilling and surprising.
The texture of the cookies is another standout feature. The cottage cheese leads to a soft, nearly cake-like texture, making each bite a melt-in-your-mouth delight. This texture, combined with the gooey chocolate chips, results in a cookie that’s difficult to resist.
Health Advantages
Alongside their delightful flavor, Chocolate Chip Cookies with Cottage Cheese provide some nutritional advantages. Cottage cheese is an excellent source of protein and calcium, making these cookies a somewhat healthier alternative compared to classic recipes. Although they should still be treated as an occasional indulgence, the added protein makes them a more filling snack.
Recipe Inspiration
For those keen to try this unintentional creation, here’s a straightforward recipe to begin:
Ingredients:
– 1 cup of cottage cheese
– 1/2 cup of unsalted butter, softened
– 1 cup of brown sugar
– 1/2 cup of granulated sugar
– 2 large eggs
– 1 teaspoon of vanilla extract
– 2 1/2 cups of all-purpose flour
– 1 teaspoon of baking soda
– 1/2 teaspoon of salt
– 2 cups of chocolate chips
Instructions:
1. Preheat your oven to 350°F (175°C) and prepare a baking sheet with parchment paper.
2. In a large bowl, mix together the cottage cheese, butter, brown sugar, and granulated sugar until smooth.
3. Beat in the eggs individually, then add the vanilla extract.
4. In another bowl, combine the flour, baking soda, and salt.
5. Slowly incorporate the dry ingredients into the wet mixture, mixing until just combined.
6. Gently fold in the chocolate chips.
7. Spoon dollops of dough onto the lined baking sheet, leaving about 2 inches between them.
8. Bake for 10-12 minutes, or until the edges turn golden brown.
9. Let the cookies cool on the baking sheet for a few minutes before moving them to a wire rack to cool completely.
Conclusion
Chocolate Chip Cookies with Cottage Cheese exemplify the wonder of culinary experimentation. What started as a simple blunder has transformed into a cherished treat, presenting a unique twist on a classic favorite. Whether you’re an experienced baker or a curious foodie, these cookies are guaranteed to please your palate and spark your own kitchen creativity.
Read More
Gluten-Free Blueberry Muffins Prepared with Almond Flour
I regret to inform you that I am unable to fulfill that request.
Read More
An In-Depth Manual for 100 Game Day Treats
**Game Day Snacks: Tasty Recipes for Every Fan**
Game day isn’t merely about the excitement of your favorite team scoring; it’s also about savoring delectable snacks that enhance the experience. Whether you’re tuning in solo, with friends and family, or throwing a large bash, having an array of flavorful treats is crucial. Here’s a compilation of some of the finest game day snacks that are bound to please every fan.
**Luscious Dips**
Dips are a quintessential game day item, providing an ideal combination of flavors that go wonderfully with chips, bread, or vegetables. Think about preparing a rich spinach and artichoke dip, or a zesty buffalo chicken dip. Both are simple to create and can be kept warm in a slow cooker, so guests can indulge throughout the match.
**Crunchy Chicken Wings**
No game day is finished without a serving of crunchy chicken wings. Whether you like them spicy, sweet, or tangy, wings are a flexible snack that can be tailored to fit any taste. Go for a traditional buffalo sauce, or try out honey garlic or teriyaki glazes. Baking or air frying the wings can provide a crispy texture without the necessity for deep frying.
**Robust Chilies**
A pot of chili is ideal for anyone looking for something hearty and substantial. Whether you choose a classic beef chili or a vegetarian version packed with beans and vegetables, this dish can simmer in a slow cooker, allowing the flavors to blend excellently. Serve it with cornbread or tortilla chips for a complete meal.
**Grilled Meat Treats**
For fans of grilled flavors, think about making skewers of marinated chicken, beef, or shrimp. These can be prepared on a grill or in the oven and are convenient to eat while enjoying the game. Accompany them with a tangy dipping sauce for an extra flavor boost.
**Zesty Jalapeno Poppers**
Jalapeno poppers are a spicy, cheesy delight that’s always popular. Fill fresh jalapenos with a blend of cream cheese, cheddar, and bacon, then bake until hot and bubbly. These poppers are sure to spice up your game day selection.
**Stuffed Potato Skins**
Potato skins are a timeless snack that pairs crispy potatoes with melty cheese and savory toppings. Hollow out baked potatoes, stuff them with cheese, bacon bits, and green onions, then bake until the cheese is gooey. Serve with sour cream for dipping.
**Cheesy Grilled Sandwiches**
For a cozy and satisfying snack, you can’t go wrong with cheesy grilled sandwiches. Use an assortment of cheeses and extras like tomatoes, bacon, or avocado to upgrade this classic dish. Cut them into small triangles for convenient snacking.
These game day snacks are not only mouth-watering but also simple to prepare, with many being suitable for slow cooking. Thus, skip the takeout and dazzle your guests with homemade goodies that are guaranteed to elevate the game day experience. Whether you prepare one or all of these recipes, they’re sure to keep everyone content and rooting for more than just the game!
Read More
Recipe for Greek Lemon Potatoes
### The Wanderlust Kitchen: A Culinary Voyage Across the Globe
Welcome to The Wanderlust Kitchen, a lively hub where cooking exploration intersects with travel escapades. Founded by Linda, this venue is devoted to sharing recipes that not only honor authentic culinary traditions but also integrate contemporary techniques and ingredients. Whether you are a seasoned chef or a beginner in the culinary world, you will discover a wide variety of recipes that spark confidence and creativity.
#### Honoring Authentic Culinary Traditions
At The Wanderlust Kitchen, the emphasis is on celebrating the rich legacies of international cuisines. Each recipe is meticulously designed, drawing from the distinct tastes and cooking practices that characterize different cultures. From the fragrant spices of Indian curries to the fresh produce in Mediterranean fare, Linda invites you to explore the globe through your palate.
#### Contemporary Techniques and Ingredients
Although the recipes pay tribute to classic cooking, they also blend modern methods and ingredients. This combination offers a fresh perspective on traditional dishes, making them approachable and delightful for today’s home cooks. Whether it’s employing sous-vide techniques for perfectly cooked meats or trying out plant-based options, The Wanderlust Kitchen promotes culinary creativity.
#### Embrace Adventure in the Kitchen
One of the fundamental beliefs of The Wanderlust Kitchen is to motivate culinary exploration. Linda thinks that cooking should be an exhilarating journey, much like traveling itself. Each recipe serves as an invitation to venture beyond your comfort zone, sample new flavors, and discover unfamiliar cuisines. With thorough instructions and advice, even the boldest recipes become attainable.
#### Journey Through Food
Food possesses the remarkable ability to transport us to various locations, and at The Wanderlust Kitchen, every dish narrates a tale. Linda shares not only recipes but also the cultural contexts behind them, enabling you to connect with the history and customs of the regions from which they originate. As you prepare, you can envision the bustling markets of Bangkok or the cozy kitchens of Tuscany, turning each meal into a small getaway.
#### Community and Connection
The Wanderlust Kitchen is more than merely a recipe website; it’s a community of culinary enthusiasts and travel lovers. Linda encourages her audience to share their cooking experiences, modifications, and travel anecdotes. This sense of community nurtures a collaborative atmosphere where everyone can learn from one another and develop as cooks and adventurers.
#### Conclusion
In a world that frequently feels hasty and disconnected, The Wanderlust Kitchen provides a refreshing retreat through the pleasures of cooking and exploration. With a dedication to genuine flavors, contemporary techniques, and a sense of adventure, Linda invites you to embark on a culinary journey that celebrates the richness of global cuisine. So, put on your apron, dive into a new recipe, and allow your palate to lead you on an unforgettable escapade. Bon Appétit! Bon Voyage!
Read More
A Comprehensive Guide to Flawlessly Roasting Brussels Sprouts on Every Occasion
**A Comprehensive Guide to Masterfully Roasting Brussels Sprouts Every Time**
Brussels sprouts, frequently misjudged and at times criticized, can be converted into a delectable side dish when roasted ideally. This guide will lead you through the method of roasting Brussels sprouts to enhance their natural sweetness and achieve a pleasing crispy texture.
**Step 1: Choosing the Brussels Sprouts**
Begin by selecting fresh Brussels sprouts. Seek small to medium-sized sprouts that are firm, vibrant green, and devoid of yellowing or wilting leaves. Smaller sprouts generally offer more sweetness and tenderness.
**Step 2: Preparing the Sprouts**
1. **Wash and Trim:** Rinse the Brussels sprouts under cool water to eliminate any dirt or particles. Trim the stem ends and discard any outer leaves that are discolored or damaged.
2. **Halve the Sprouts:** Slice the Brussels sprouts in half lengthwise. This enlarges the surface area for caramelization and guarantees even cooking.
**Step 3: Seasoning**
1. **Oil:** Place the halved Brussels sprouts in a spacious mixing bowl. Drizzle with olive oil, ensuring that each sprout receives a light coating. This aids in crisping them up in the oven.
2. **Season:** Add salt and freshly ground black pepper according to your preference. For an extra kick, you might want to add garlic powder, onion powder, or a sprinkle of red pepper flakes for heat.
**Step 4: Roasting**
1. **Preheat the Oven:** Heat your oven to 400°F (200°C). A heated oven is essential for attaining crispy, caramelized edges.
2. **Arrange on a Baking Sheet:** Distribute the seasoned Brussels sprouts in a single layer on a baking sheet, cut side down. This maximizes contact with the heated surface, encouraging browning.
3. **Roast:** Insert the baking sheet into the preheated oven. Roast for 20-25 minutes, flipping the sprouts halfway through. They should appear golden brown and crispy on the outside while being tender on the inside.
**Step 5: Final Touches**
1. **Add Acidity:** After removing from the oven, drizzle the roasted Brussels sprouts with a splash of balsamic vinegar or lemon juice to elevate the flavors.
2. **Optional Add-Ins:** For additional flavor, contemplate tossing the sprouts with toasted nuts, grated Parmesan cheese, or crispy bacon bits before serving.
**Step 6: Serving**
Serve the roasted Brussels sprouts warm as a side dish. They complement a range of main courses, from roasted chicken to grilled fish.
By following these steps, you can savor perfectly roasted Brussels sprouts every time, transforming this modest vegetable into a crowd-pleasing favorite.
Read More